Build an ethernet web interface for Arduino
A lot of the Arduino projects written about on Engineer@Home can’t do without a graphical user interface. Therefore this article will describe how to build a web interface yourself, and then serve it from the SD-card via ethernet.
Arduino Ethernet Shield
It goes without saying that, along an Arduino, an Ethernetshield is needed to communicate over Ethernet. Using the Web tutorial from the Arduino website you can then serve a simple web page to control the ports of your Arduino. But well, I’m a designer, so it should look nice too!
HTML & CSS for Arduino
Websites are normally written in HTML and CSS: HTML for structure, CSS for the layout. For example, the web server tutorial draws a simple HTML page without further formatting. Once we expand this page and also going to add CSS rules, the file gets very large. So large that it will exceed the RAM size of the Arduino. The first rescue is the program memory which you can access using the pgmspace library.
Serving a webpage from the SD-card
With a little web interface program memory also runs out quickly, but fortunately the ethernetshield has a micro SD card slot. It would be ideal if we could save the HTML and CSS files on the SD card and could serve it via ethernet from there.
Using the SDFat library you can use the micro-SD card access, and in combination with the web server tutorial you then offer the files over the network. There’s just one problem: from SD you can only offer static files, how do you make sure that you can display status buttons or sensors? Actually, we want to make a kind of very simple PHP solution. (PHP is a language used to add data to webpage before they are sent to the user.)
Sensor data in the Arduino web interface
Well, we want to display a nice web interface with our Arduino, as much of the HTML and CSS should be on SD card to save the memory of the Arduino but it must be possible for the Arduino to add dynamic data to it before the page is sent via Ethernet.
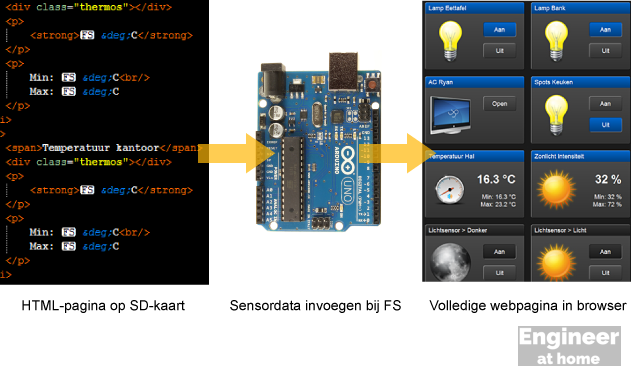
To make it as simple as possible, I’m not building a complete PHP implementation or invent a new programming language. Because I serve only one page, I know exactly the sequence of the various sensors and buttons that I want to fill, the only thing I want to know in the HTML page is on which spot I have to fill in the data. I use a simple marker in my HTML document, the ASCII Control Character 28: the File Separator.
In a good editor like Notepad++ these control characters are displayed, in Word or Notepad you will not see them. You type a file-separator with ALT+0028 (on the numpad). The Arduino knows him simply as a char value of 28 when reading files from SD.
Processing the HTML-file on the Arduino
Using the following code, I let the Arduino parse the HTML file:
myFile.open("home.htm", O_READ);
Read_File_Upto_FS();
// housemode
if (Status) {
client.print(F(« on »));
Read_File_Upto_FS();
client.print(F(« off »));
}
else {
client.print(F(« on »));
Read_File_Upto_FS();
client.print(F(« off »));
}
// etcetera…
The Read_File_Upto_FS() function reads the html file from the SD card to the File Separator, then adds the Arduino status of the house, and goes further until the following File Separator is encountered.
void Read_File_Upto_FS() {

while ((buffer = myFile.read()) != 28) {

client.print((char)buffer);

}

}
This whole routine is only incidentally called after the web server has set up a connection, so the client.print() writes the data straight away to the web client.
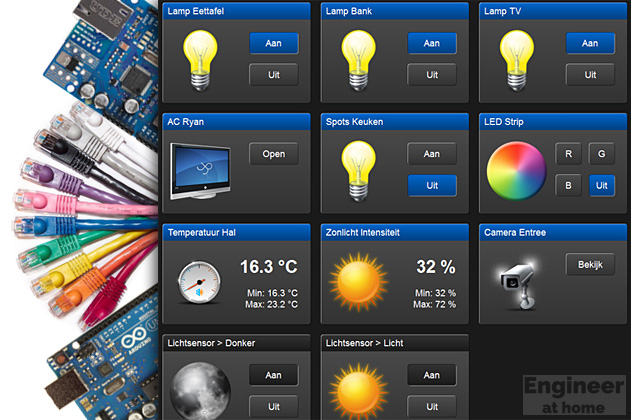
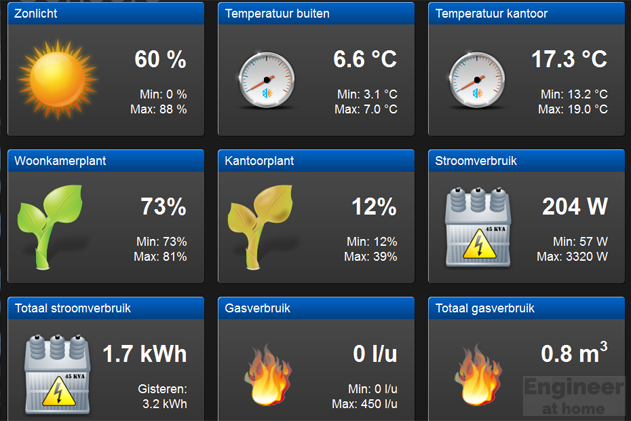
Graphic design of the web interface
The interface is responsive constructed with the aid of the latest CSS3 techniques. That is, the widgets automatically arrange in so far as the screen size allows. The various gradients and drop shadows can now be made easily with CSS. Below is a piece of CSS code that defines the format of a block.
li, li p a {

background: linear-gradient(top, #4d4d4d 0%, #333333 100%);

border-radius: 5px;

box-shadow: inset 1px 1px 0px 0px rgba(255, 255, 255, 0.5), 1px 1px 0px 0px rgba(0, 0, 0, 0.5);

}

li span {

border-radius: 5px 5px 0 0;

box-shadow: inset 1px 1px 0px 0px rgba(255, 255, 255, 0.5);

color: #fff;

display: block;

height: 23px;

padding: 5px 10px;

}

li span, li p a.aan {

background-color: #004080;

background: linear-gradient(top, #0066cc 0%, #004080 100%);

}
To create the gradients and box-shadows in different browsers you still may need vendor prefixes. The CSS3 Generator generates all the codes at once.
Icons and other graphics in the Arduino interface
The icons for the various devices and sensors of course you can make your own, but in this case I’ve been lazy and I have downloaded them from Iconfinder.com.
I hope this article provides enough guidance for the self build of an Arduino web interface. If you still have questions, ask them below, I’ll try to answer them there or expand the article.
https://www.engineerathome.com/

