How to Set Up WiFi on the Raspberry Pi
Note: This tutorial is for the Raspberry Pi 2 and earlier versions that need a USB WiFi adapter. To set up WiFi on the Raspberry Pi 3, please see this tutorial.
In a previous tutorial, I explained how to establish an SSH connection to your Raspberry Pi over ethernet without using an external keyboard or monitor. Connecting with an ethernet cable, is great if you want to leave it connected to your router with a physical cable. But I prefer to use WiFi, which gives me a lot more flexibility with where I can keep my Pi while it’s running.
Be careful when choosing a WiFi adapter for the Raspberry Pi though, because not all of them will work out of the box. I found that this one on Amazon works great without any driver installations needed.
Still, there are a couple things that need to be set up for any WiFi adapter to work properly with your Raspberry Pi. I’ll go through them step by step in this article. You should already have set up the SSH connection over ethernet, as described in this post.
This video will walk you through the steps, but see below for more details:
Edit the Network Interfaces File
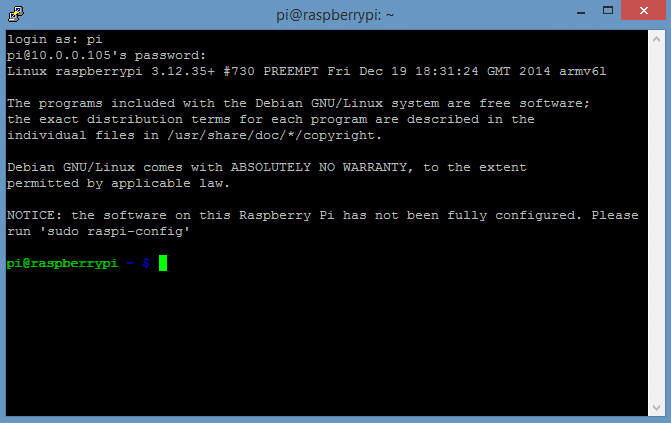
With your USB WiFi adapter plugged into the Pi, power up the Pi and connect it to your internet router with an ethernet cable just like we did in the last tutorial. Now SSH into your Pi with PuTTY, and get to the command prompt:
We’ll need to change a few things in the /etc/network/interfaces file.
To edit this file, we’ll use the Raspbian text editor Nano. Enter this at the command prompt to edit the file:
sudo nano /etc/network/interfaces
Pro Tip: If you ever want to copy something from your laptop/desktop and paste it into PuTTY, just copy it, then right click with your mouse where you want to paste it into PuTTY.
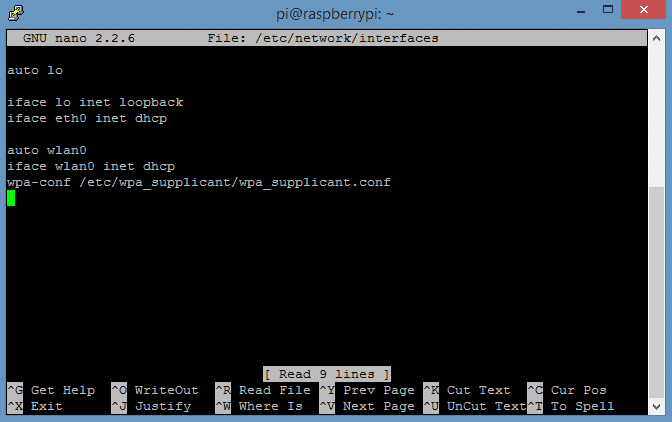
Replace the code in the file with this code:
auto lo
iface lo inet loopback
iface eth0 inet dhcp
auto wlan0
iface wlan0 inet dhcp
wpa-conf /etc/wpa_supplicant/wpa_supplicant.conf
Afterwards, the file should look like this:
Then type Ctrl-X to exit, and Y to save the changes.
Edit the wpa_supplicant.conf File
Now we need to make some changes to the /etc/wpa_supplicant/wpa_supplicant.conf file. Open the file in Nano by entering this at the command prompt:
sudo nano /etc/wpa_supplicant/wpa_supplicant.conf
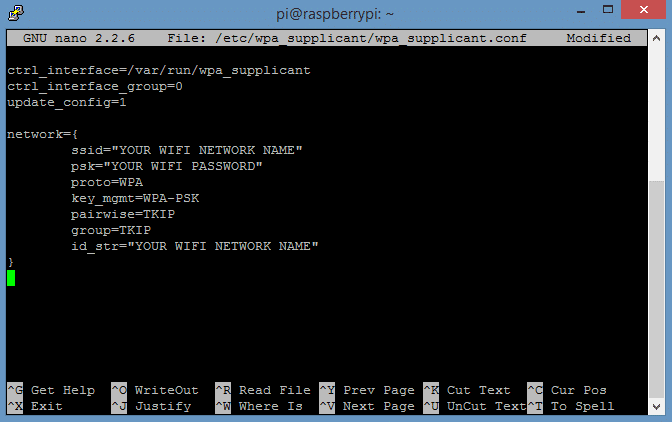
Replace the code in the file with this code:
ctrl_interface=/var/run/wpa_supplicant
ctrl_interface_group=0
update_config=1
network={
ssid= »YOUR WIFI NETWORK NAME »
psk= »YOUR WIFI PASSWORD »
proto=WPA
key_mgmt=WPA-PSK
pairwise=TKIP
group=TKIP
id_str= »YOUR WIFI NETWORK NAME »
}
The file should look like this:
The entry for ssid=”YOUR WIFI NETWORK NAME” is the name of your wireless network, typed exactly as it appears when you connect to your WiFi from another computer. The letters are case sensitive, and the ” ” marks should be left in.
The entry for psk=”YOUR WIFI PASSWORD” is the password you normally use to login to the network.
Re-enter your network name in the id_str=”YOUR WIFI NETWORK NAME” line.
Now press Ctrl-X and Y to exit and save changes to the file.
Now shutdown the Pi by entering sudo poweroff at the command prompt. Unplug the Pi from power, and disconnect the ethernet cable from your internet router. Now restart the Pi.
Find the New Local IP Address
Up to this point we were SSHing to the Pi with the local IP address on the ethernet port. The IP will be different on WiFi, so you’ll need to use Advanced IP Scanner to find the new one. Once you get that, SSH with PuTTY using the IP address for the WiFi port.
Test the WiFi Connection
After you log back into the Pi, check the status of your WiFi connection by typing iwconfig at the command prompt. Your WiFi network name should appear under ESSID: “YOUR WIFI NETWORK NAME”, in my case it’s “Siamese“. If your WiFi connection is successful, you’ll see a message like this:
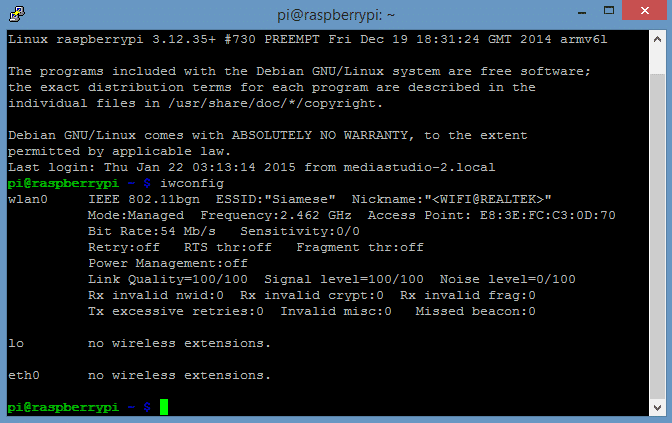
If you see something like “Link Quality=0/100” or “Signal Level=0/100” in the wlan0 section, it means the Pi isn’t connected to WiFi. Go back and make sure that you have entered everything exactly as it’s shown in the images.
Another way to test your Pi’s WiFi connection to the internet is by pinging Google. Do this by entering sudo ping www.google.com:

PuTTY is great if all you need to do is access your Raspberry Pi from the command line. However, many features are only available through the Raspbian desktop. In order to access the desktop remotely, we need to install and configure a Remote Desktop Connection. Read How to Access the Raspberry Pi Desktop With a Remote Desktop Connection for a tutorial on how to do that.
Thanks for reading! Feel free to leave a comment if you’re having trouble setting this up and I’ll do my best to help you out. And be sure to subscribe to get an email when we publish new tutorials!