How to Set Up the DHT11 Humidity Sensor on the Raspberry Pi
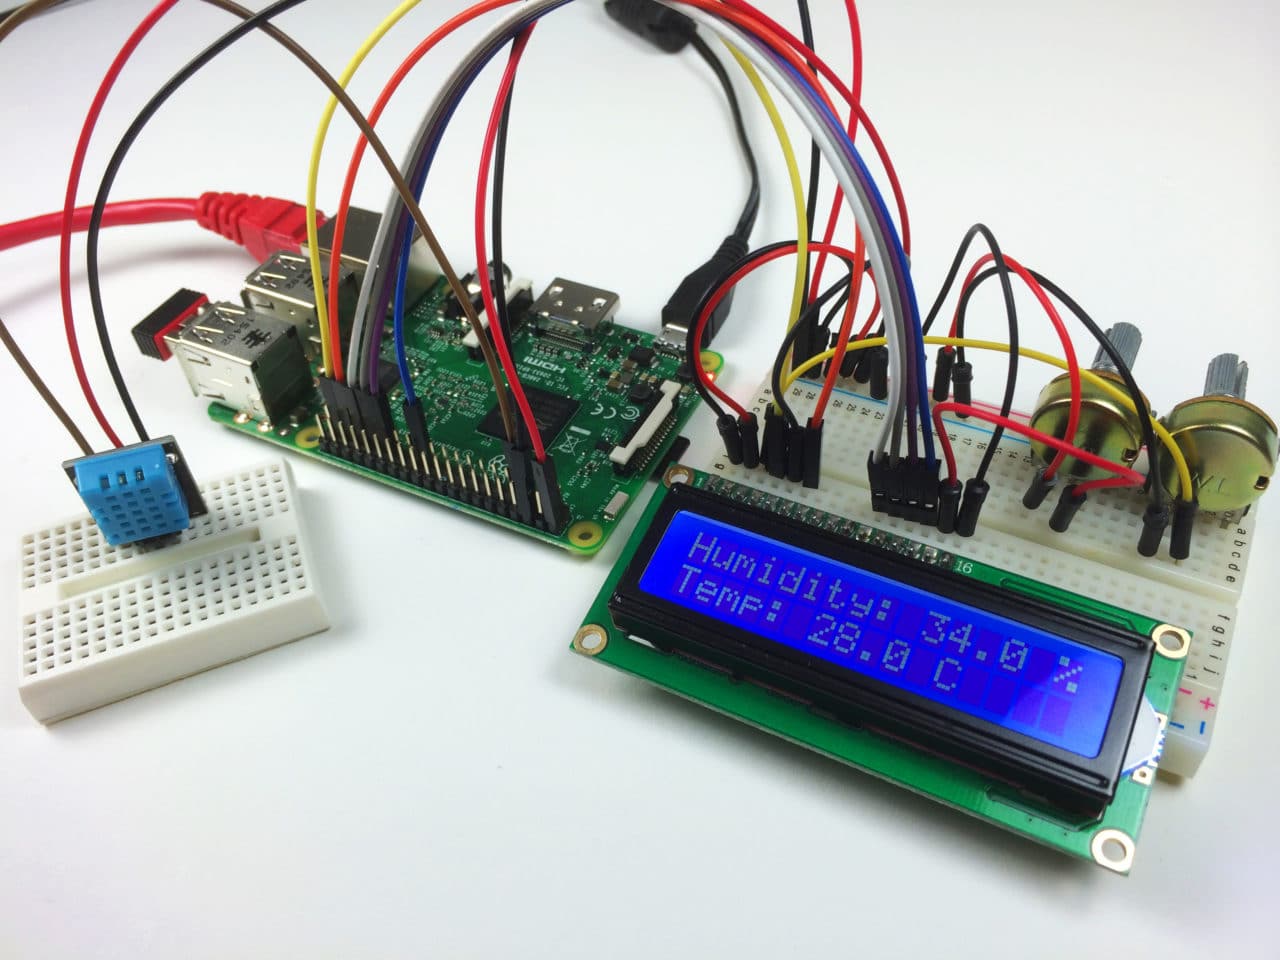
The DHT11 temperature and humidity sensor is a nice little module that provides digital temperature and humidity readings. It’s really easy to set up, and only requires one wire for the data signal. These sensors are popular for use in remote weather stations, soil monitors, and home automation systems.
Programming the DHT11 and connecting it to a Raspberry Pi is pretty simple too. In this tutorial, I’ll show you how to connect the DHT11 to the Raspberry Pi and output the humidity and temperature readings to an SSH terminal or to an LCD. Then I’ll give you some example programs for programming it with either C or Python.
Parts used in this tutorial:
We have another tutorial on the DHT11 for the Arduino that goes into detail on relative humidity and how the DHT11 measures it. So instead of repeating all of that here, check out How to Set Up the DHT11 Humidity Sensor on an Arduino, then come back for the specifics on setting it up on the Raspberry Pi.
But just to quickly summarize… The DHT11 has a surface mounted NTC thermistor and a resistive humidity sensor. An IC on the back of the module converts the resistance measurements from the thermistor and humidity sensor into digital temperature (in °C) and relative humidity measurements.
This video will walk you through the setup steps and show you how the measurements look in real time:
Connecting the DHT11 to the Raspberry Pi
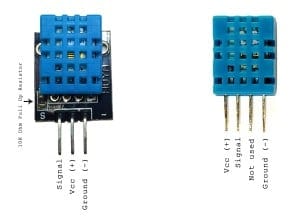
There are two variants of the DHT11 you’re likely to come across. One is a three pin PCB mounted module and the other is a four pin stand-alone module. The pinout is different for each one, so connect the DHT11 according to which one you have:
Also, some of the PCB mounted modules might have a different pinout than the one above, so be sure to check your sensor for any labels indicating which pin is Vcc, ground or signal.
Wiring for SSH Terminal Output
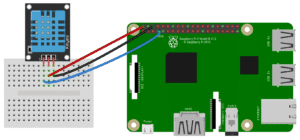
Three Pin DHT11 With SSH Output
If you have a three pin DHT11 and want to output the humidity and temperature to an SSH terminal, wire it like this:
Four Pin DHT11 With SSH Output
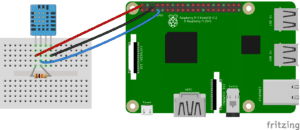
If you have a four pin DHT11 and want to output the humidity and temperature to the SSH terminal, wire it like this:
The resistor is a 10K Ohm pull up resistor connected between the Vcc and signal lines.
Wiring for LCD Output
Three Pin DHT11 With LCD Output
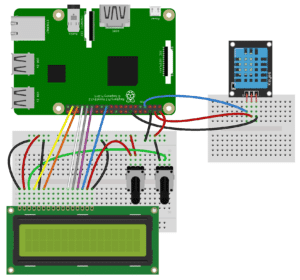
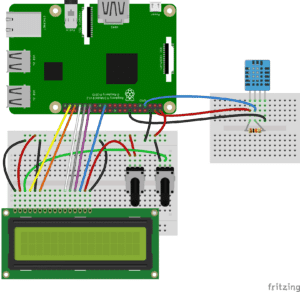
If you want to output the temperature and humidity readings to an LCD display and have a three pin DHT11, connect it to the Pi like this:
Four Pin DHT11 With LCD Output
If you have a four pin DHT11 and want to output the temperature and humidity to an LCD display, connect it like this:
The resistor is a 10K Ohm pull up resistor connected between the Vcc and signal lines.
Programming the DHT11
I’ll explain how to use both C and Python to get temperature and humidity from the DHT11, so you’ll be able to incorporate the DHT11 into pretty much any existing RPi project.
If you’re not familiar with writing and running programs in Python or C on the Raspberry Pi, check out one of these tutorials:
- How to Write and Run a Python Program on the Raspberry Pi
- How to Write and Run a C Program on the Raspberry Pi
Programming the DHT11 With C
We’ll be using WiringPi to program the DHT11 in C. If you don’t have WiringPi installed already, follow this link for instructions on how to install WiringPi.
The examples below are stand-alone C programs, which will need to be saved to a file with a “.c” extension, then complied by entering this at the command prompt:
gcc -o example example.c -lwiringPi -lwiringPiDev
(change example and example.c to the file name you want to use)
Then run the program with:
sudo ./example
Output to an SSH Terminal
The following C program will output the humidity and temperature (in °C and °F) readings to an SSH terminal:
#include <wiringPi.h>
#include <stdio.h>
#include <stdlib.h>
#include <stdint.h>
#define MAXTIMINGS	85
#define DHTPIN		7
int dht11_dat[5] = { 0, 0, 0, 0, 0 };

void read_dht11_dat()
{
	uint8_t laststate	= HIGH;
	uint8_t counter		= 0;
	uint8_t j		= 0, i;
	float	f;

	dht11_dat[0] = dht11_dat[1] = dht11_dat[2] = dht11_dat[3] = dht11_dat[4] = 0;

	pinMode( DHTPIN, OUTPUT );
	digitalWrite( DHTPIN, LOW );
	delay( 18 );
	digitalWrite( DHTPIN, HIGH );
	delayMicroseconds( 40 );
	pinMode( DHTPIN, INPUT );

	for ( i = 0; i < MAXTIMINGS; i++ )
	{
		counter = 0;
		while ( digitalRead( DHTPIN ) == laststate )
		{
			counter++;
			delayMicroseconds( 1 );
			if ( counter == 255 )
			{
				break;
			}
		}
		laststate = digitalRead( DHTPIN );

		if ( counter == 255 )
			break;

		if ( (i >= 4) && (i % 2 == 0) )
		{
			dht11_dat[j / 8] <<= 1;
			if ( counter > 16 )
				dht11_dat[j / 8] |= 1;
			j++;
		}
	}

	if ( (j >= 40) &&
	     (dht11_dat[4] == ( (dht11_dat[0] + dht11_dat[1] + dht11_dat[2] + dht11_dat[3]) & 0xFF) ) )
	{
		f = dht11_dat[2] * 9. / 5. + 32;
		printf( "Humidity = %d.%d %% Temperature = %d.%d C (%.1f F)\n",
			dht11_dat[0], dht11_dat[1], dht11_dat[2], dht11_dat[3], f );
	}else  {
		printf( "Data not good, skip\n" );
	}
}

int main( void )
{
	printf( "Raspberry Pi wiringPi DHT11 Temperature test program\n" );

	if ( wiringPiSetup() == -1 )
		exit( 1 );

	while ( 1 )
	{
		read_dht11_dat();
		delay( 1000 );
	}

	return(0);
}
Output to an LCD
This C program will output the DHT11 readings to an LCD display:
#include <wiringPi.h>
#include <lcd.h>
#include <stdio.h>
#include <stdlib.h>
#include <stdint.h>
//USE WIRINGPI PIN NUMBERS
#define LCD_RS 25 //Register select pin
#define LCD_E 24 //Enable Pin
#define LCD_D4 23 //Data pin 4
#define LCD_D5 22 //Data pin 5
#define LCD_D6 21 //Data pin 6
#define LCD_D7 14 //Data pin 7
#define MAXTIMINGS 85
#define DHTPIN 7
int lcd;
int dht11_dat[5] = {0, 0, 0, 0, 0};
void read_dht11_dat()
{
uint8_t laststate = HIGH;
uint8_t counter = 0;
uint8_t j = 0, i;
float f;
dht11_dat[0] = dht11_dat[1] = dht11_dat[2] = dht11_dat[3] = dht11_dat[4] = 0;
pinMode(DHTPIN, OUTPUT);
digitalWrite(DHTPIN, LOW);
delay(18);
digitalWrite(DHTPIN, HIGH);
delayMicroseconds(40);
pinMode(DHTPIN, INPUT);
for (i = 0; i < MAXTIMINGS; i++)
{
counter = 0;
while (digitalRead(DHTPIN) == laststate)
{
counter++;
delayMicroseconds(1);
if (counter == 255)
{
break;
}
}
laststate = digitalRead(DHTPIN);
if (counter == 255)
break;
if ((i >= 4) && (i % 2 == 0))
{
dht11_dat[j / 8] <<= 1;
if (counter > 16)
dht11_dat[j / 8] |= 1;
j++;
}
}
if ((j >= 40) && (dht11_dat[4] == ((dht11_dat[0] + dht11_dat[1] + dht11_dat[2] + dht11_dat[3]) & 0xFF)))
{
f = dht11_dat[2] * 9. / 5. + 32;
lcdPosition(lcd, 0, 0);
lcdPrintf(lcd, « Humidity: %d.%d %%\n », dht11_dat[0], dht11_dat[1]);
lcdPosition(lcd, 0, 1);
//lcdPrintf(lcd, « Temp: %d.0 C », dht11_dat[2]); //Uncomment for Celsius
lcdPrintf(lcd, « Temp: %.1f F », f); //Comment out for Celsius
}
}
int main(void)
{
int lcd;
wiringPiSetup();
lcd = lcdInit (2, 16, 4, LCD_RS, LCD_E, LCD_D4, LCD_D5, LCD_D6, LCD_D7, 0, 0, 0, 0);
while (1)
{
read_dht11_dat();
delay(1000);
}
return(0);
}
For temperature in Celsius, un-comment line 72, then comment out line 73. To find out more about how to control text on an LCD with C, check out How to Setup an LCD on the Raspberry Pi and Program it With C.
Programming the DHT11 With Python
We’ll be using the Adafruit DHT11 Python library. You can download the library using Git, so if you don’t have Git installed on your Pi already, enter this at the command prompt:
sudo apt-get install git-core
Note: If you get an error installing Git, run sudo apt-get update and try it again.
To install the Adafruit DHT11 library:
1. Enter this at the command prompt to download the library:
git clone https://github.com/adafruit/Adafruit_Python_DHT.git
2. Change directories with:
cd Adafruit_Python_DHT
3. Now enter this:
sudo apt-get install build-essential python-dev
4. Then install the library with:
sudo python setup.py install
Output to an SSH Terminal
This Python program will output the temperature and humidity readings to an SSH terminal:
#!/usr/bin/python
import sys
import Adafruit_DHT
while True:
humidity, temperature = Adafruit_DHT.read_retry(11, 4)
print ‘Temp: {0:0.1f} C Humidity: {1:0.1f} %’.format(temperature, humidity)
Output to an LCD
To output the DHT11 readings to an LCD, we’ll need to install another Python library called RPLCD to drive the LCD. To install the RPLCD library, we first need to install the Python Package Index, or PIP. PIP might already be installed on your Pi, but if not, enter this at the command prompt to install it:
sudo apt-get install python-pip
After you get PIP installed, install the RPLCD library by entering:
sudo pip install RPLCD
Once the library is installed, you can use the following code to output the DHT11 readings to an LCD:
#!/usr/bin/python
import sys
import Adafruit_DHT
from RPLCD import CharLCD
lcd = CharLCD(cols=16, rows=2, pin_rs=37, pin_e=35, pins_data=[33, 31, 29, 23])
while True:
humidity, temperature = Adafruit_DHT.read_retry(11, 4)
lcd.cursor_pos = (0, 0)
lcd.write_string(« Temp: %d C » % temperature)
lcd.cursor_pos = (1, 0)
lcd.write_string(« Humidity: %d %% » % humidity)
Also, check out Raspberry Pi LCD Set Up and Programming in Python to see how to do things like scrolling and positioning text.
That should about cover most of what you’ll need to get the DHT11 up and running on your Raspberry Pi. Hope this made it easier for you. Be sure to subscribe if you liked this article and found it useful, and if you have any questions or need help with anything, just leave a comment below…
